USD
  • EUR
  • INR
  • USD
Cart
Cart 0
  • You have no items in your shopping cart.
    Odoo Apps Extensions
    Cart
    Cart 0
    • You have no items in your shopping cart.
    Hire a Developer
    ×
    Contact Us!
    Send Again
    Close
    Please Login to Write Your Review
    Odoo POS Manage Order Selector

    Odoo POS Manage Order Selector

    x
    Free

    * Required Fields

    $39.00
    Add To Cart

    Odoo POS Manage Order Selector moves extra orders into a dropdown list and shows customer names on order buttons in Odoo POS.


    • Show POS orders in a dropdown list once they cross the backend limit.

    • Set the maximum orders allowed in the order selector from POS settings.

    • Keep only the allowed number of order buttons on the Order Selector tab.

    • Display the customer name on every order button, selected or not.

    • Let cashiers find an order in the dropdown list by the customer name.

    • Open any order from the dropdown list with one click on its order button.

    • Keep the new order and delete order buttons inside the POS screen.

    • Manage many open orders on a tablet without a crowded order bar.

    Odoo POS Manage Order Selector
    Odoo POS Manage Order Selector
    $39.00
    Check How It Works

    Need Help Deciding?

    Support answers within one business day.

    Open a ticket
    $39.00
    Configure and Buy
    X
    • Description
    • Reviews
    • FAQ
    • Customers ()
    • Specifications
    • Cloud Hosting
    • Changelog

    Odoo POS Manage Order Selector is an Odoo Point of Sale module that controls how open sales appear in the order selector. It moves extra tickets into a dropdown list after a limit that the admin sets in the backend.

    The admin types a number into the limit field of the POS settings. When the cashier opens more tickets than that number, the extra ones move into the Drop Down Order Selector Tab.

    Each button in the session shows the name of the customer linked to that sale. This name appears on selected and unselected buttons, so the cashier can tell open tickets apart quickly.

    A click on the dropdown tab opens a list of the remaining tickets with their numbers and customer names. Clicking an entry in that list loads its details on the POS screen.

    The setup needs a single number and no other backend configuration, which keeps it easy for store staff. The store listing covers Odoo versions 8.x through 20.x for this module.

    Additionally, if you want to create an order in one POS session and validate it elsewhere, then check Odoo POS Order Sync.
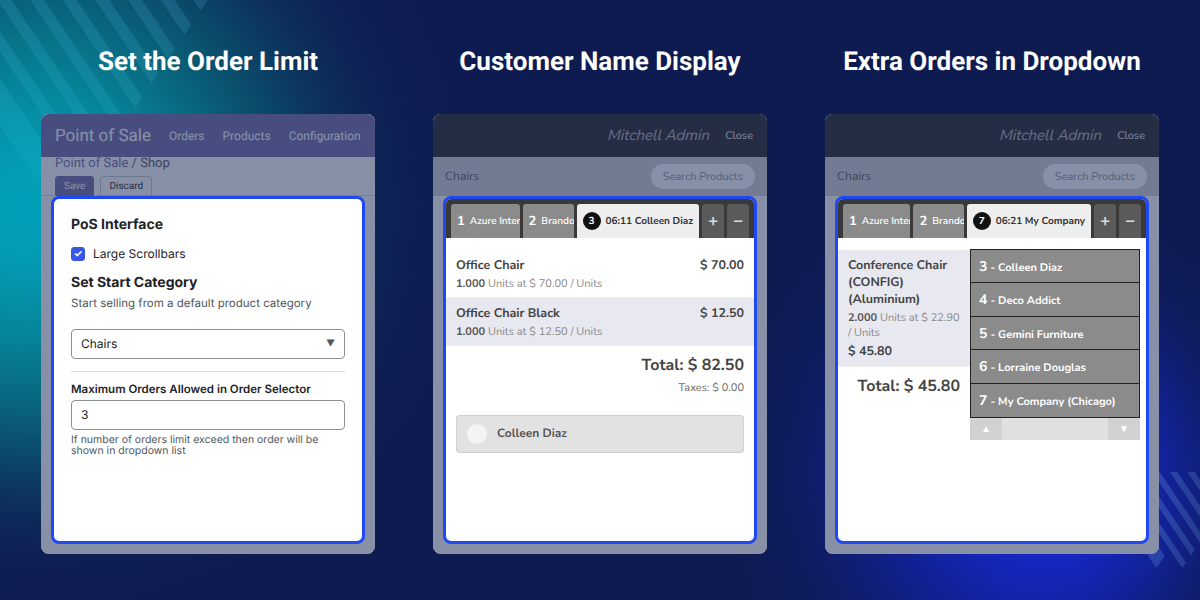
    Odoo POS Manage Order Selector

    Highlighted Features of Odoo POS Manage Order Selector

     Dropdown List for Extra Orders

    Move open tickets beyond the set limit into one dropdown tab instead of adding more buttons to the bar.

     Backend Order Limit

    Choose how many buttons the Order Selector tab shows before the dropdown list takes over for the rest.

     Customer Name on Order Buttons

    Show the linked customer name on every button in the session, whether that sale is selected or not.

     Find Orders by Customer

    Pick the right sale from the dropdown list by reading the customer name printed next to each ticket number.

     Tablet Friendly Order Bar

    Keep the order bar readable on small tablet screens, where only two or three buttons fit in one row.

     One Field Setup

    Start using the module after entering a single limit in the POS settings, with no other backend configuration needed.

    Why Do We Need Odoo POS Manage Order Selector?

    Odoo POS Manage Order Selector solves a layout problem in the default Odoo POS, where each new sale adds a button. With many open tickets, the bar fills up quickly, and the plus and minus buttons get pushed outside the POS screen.

    The problem is worse on tablets, because a small screen manages only two or three tickets before the bar gets hard to use. This module caps the bar at a fixed number of buttons.

    Every extra ticket goes into one dropdown list that cashiers can open at any time. Here is a real case: with a limit of 3, the bar shows two buttons plus a dropdown tab holding every later ticket.

    Also, if you want cashiers to print the receipt of an earlier POS sale again, you can check our extension Odoo POS Order Reprint.

    Use Cases

    • Busy Checkout Counters

      Cashiers who keep many tickets open at once can park the extra ones in the dropdown list and keep the bar clear.

    • Tablet Based POS Terminals

      Stores running Odoo POS on tablets can handle more than three open tickets while the plus button stays on the screen.

    • Switching Between Waiting Customers

      Staff serving several customers in turn can find each sale by the buyer's name instead of guessing from ticket numbers.

    • Different Limits per POS

      Admins can set a lower limit for a POS on a small screen, because each POS keeps its own value.

    Set Maximum Orders Allowed in Order Selector

    Maximum Orders Allowed in Order Selector field sets how many buttons the POS bar can hold. Once open tickets cross this number, the remaining ones move into a dropdown list.
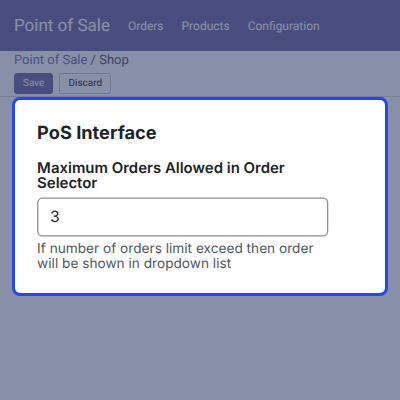
    • Open the Point of Sale app and go to the settings of the chosen POS.
    • Scroll the settings form down to the field that holds the order limit.
    • Enter how many buttons the Order Selector tab should show, such as 3.
    • Read the help text, which says extra tickets will be shown in a dropdown list.
    • Save the settings and open a POS session to apply the new limit.
    Set Maximum Orders Allowed in Order Selector

    Customer Name on POS Order Buttons

    Every button in the POS session carries the name of its customer. Cashiers can see whose sale each button holds without opening it first.
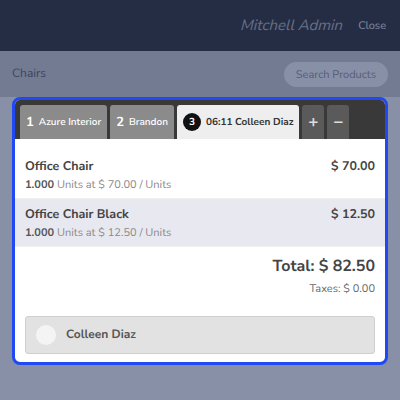
    • Show the customer name on the selected button beside the time it was created.
    • Show the customer name on unselected buttons beside the ticket number.
    • Match the name on the button with the customer shown on the POS cart panel.
    Customer Name on POS Order Buttons

    Drop Down Order Selector Tab in POS

    Drop Down Order Selector Tab appears in the bar when open tickets cross the limit set in the backend. It takes the last slot of the bar and holds every remaining sale.
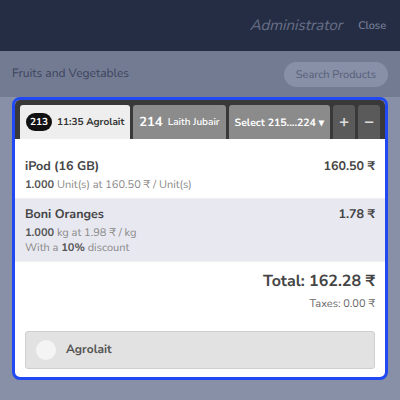
    • Show buttons on the Order Selector tab up to the configured limit.
    • Place every later ticket inside the Drop Down Order Selector Tab.
    • Label the dropdown tab with the range of ticket numbers it holds, such as 215 to 224.
    • Keep the plus and minus buttons in place next to the bar.
    Drop Down Order Selector Tab in POS

    Select an Order from the POS Dropdown List

    Clicking the dropdown tab opens a list of the tickets it holds. The cashier clicks an entry in the list, and its details load on the POS screen.
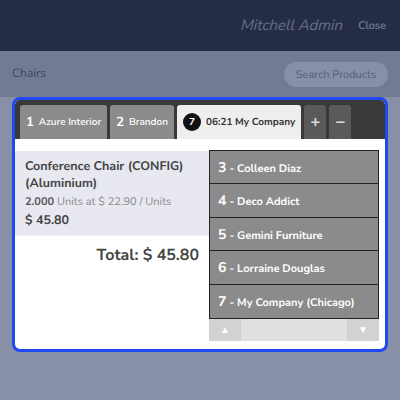
    • Open the dropdown list by clicking or focusing on the dropdown tab.
    • Read each entry as the ticket number followed by the customer name.
    • Click any entry in the list to make it the current POS sale.
    • See the selected product lines, total, and customer on the POS screen.
    • Scroll the list with its up and down arrows when it holds many tickets.
    Select an Order from the POS Dropdown List

    Odoo POS Manage Order Selector Support

    For any query or issue please create a support ticket here http://webkul.uvdesk.com

    You may also check our other top-quality Odoo Plugins.

    Specifications

    Product Version1.0.0
    Released9 years ago
    Last UpdatedOctober 7, 2026 (2 days ago)
    Supported Versions8.x  9.x  10.x  11.x  12.x  13.x  14.x  15.x  16.x  17.x  18.x  19.x  20.x  

    Ratings

    We'd love to hear your thoughts! Share your feedback and help us craft an even better experience tailored just for you.

    Write a review

    Frequently Asked Questions

     What does Odoo POS Manage Order Selector do?
    Odoo POS Manage Order Selector shows open POS tickets in a dropdown list once their count crosses a limit set in the backend. It also prints the customer name on every button in the session.
     
     Where do I set the order limit for the order selector?
    You set it in the Maximum Orders Allowed in Order Selector field, which sits in the settings of each Point of Sale. Save the settings and open a POS session to apply the new value.
     
     What happens when open tickets cross the limit?
    A Drop Down Order Selector Tab appears in the bar once open tickets cross the limit. With a limit of 3, the bar shows two buttons, and every later ticket goes into the dropdown list.
     
     How do I open a sale that is inside the dropdown list?
    Click or focus on the dropdown tab to open the list of tickets it holds. Then click the entry you need, and its details load on the POS screen.
     
     Is the customer name shown on unselected buttons too?
    Yes, the module displays the customer name on every button in the order selector, whether that sale is currently selected or not.
     
     Does the module help when I use Odoo POS on a tablet?
    Yes, a tablet screen fits only two or three buttons, and the dropdown list holds the extra tickets. This keeps the plus and minus buttons visible on the small screen.
     
     Do I need complex backend configuration to use the module?
    No, the only setting is one number field in the POS settings form. After you save a value there, the order selector follows that limit in every new session.
     
     Which Odoo versions does Odoo POS Manage Order Selector support?
    The store page lists Odoo versions 8.x through 20.x as the supported releases for this point of sale module.

    Specification

    Detailed technical features and requirements to help you understand the module’s capabilities and ensure smooth integration with your system.

    Cloud Hosting

    Detailed technical features and requirements to help you understand the module’s capabilities and ensure smooth integration with your system.

    Default Configuration Details of Server

    1 GB
    RAM
    1 Core
    Processor
    30 GB
    Hard Disk
    1 GB RAM & 1 Core Processor
    Database

    Want to know more how exactly we are going to power up your eCommerce Website with Cloud to fasten up your store

    * Server Configuration may vary as per application requirements.

    Change Logs

    Not Available